As you will undoubtably realise by now, I am a big fan of HDR photography. Normally my rule of thumb is to capture my three exposures "in camera" using auto-bracketing for my HDR photography, but sometimes, its not possible for one reason or another.
What I want to show you here is my workflow for creating an HDR image from one single photograph from the camera. With this technique I can create anywhere between three images up to nine, depending on the image.
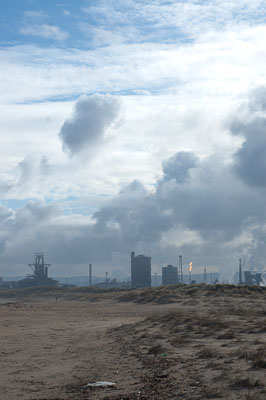 This is the original photograph, taken with my 50mm prime lens and shot at f10, ISO 400 and in RAW. Shooting in RAW is always the best option if it is available to you. Don't worry if its not as you can still create great HDR images using JPEGS too.
It is in now way a flattering image, in fact it looks bleached, blown out in the sky area and very low on contrast.
Normally I would be hitting the Delete Key on this kind of image, but HDR can help bring some life to it.
What I am going to do now is create three exposures using Adobe Lightroom so as to imitate what the camera may have taken if I had used the Auto Bracketing option.
If you do not have Lightroom, any RAW editing program should work, as long as you can adjust the exposure and other basic settings.
In Lightroom
The first thing I do in Lightroom is adjust all the major settings such as Brightness, Contrast etc down to Zero - it makes the photo look even worse! Once this is done, I am ready to create my three exposures. Again, this is all done using Lightroom, and all I need to adjust is one slider, and yes you guessed it, its the Exposure Slider.
First of all, I export the normal exposure image by right clicking on the main photo and choosing my Photomatix Preset. I have this set to export the file as its original file format, so my exported image will still be a .NEF file (Nikon's RAW format), and name the file 'Normal'.
Next I adjust the Exposure slider to read -2.00. The photograph becomes a lot darker, by 2 stops to be precise, just like my camera would take it.
Again I use the Photomatix Preset to export the image, but this time I name the file 'Under'. Finally I move the Exposure slider to read +2.00 - a very bright image is produced.
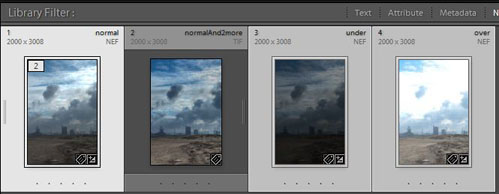
Using my Photomatix Preset I call this final image 'Over' - now I have three exposures still in RAW format, just like they would have been taken 'in camera'. Now I am ready to import the three exposures into Photomatix.
Select the three exposure images in Lightroom you have just created (see my Lightroom Preset Tutorial to make sure you get the same as I do), which should now appear in your catalogue, then Right-Click the mouse and select the Photomatix Pro option from the menu.
You should end up with a dialogue box something similar to the image below.
In Photomatix
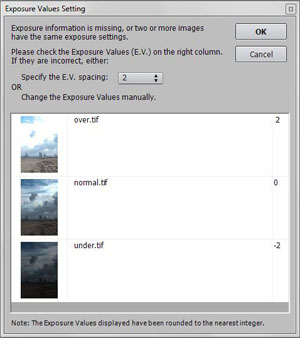
If not, then you can manually type in the exposure settings, as long as you have the settings of 2, 0 -2
Once this is done, click on the OK button to load the files into Photomatix.
Depending on the speed of your processor, this might take a few minutes to load.
Now, assuming you have not used Photomatix before, you will be presented with an image using the default settings. The image looks even worse than the original, yes? Not to worry, HDR programs can not process the image the same way as the eye can see it. What is needed next is a few alterations of the settings, and with a bit of luck the final image will be a lot better.
 If you have used Photomatix before, it will remember your last settings. Keep in mind though that one Preset will not work with every image. This is why I prefer to work from a 'Base Preset' and then adjust the sliders accordingly.
Ok, so here I have my image at the default settings - now to load up my 'Base Preset' and see what happens.
Please note I can not take credit for these settings, it took a while searching the web first, and I wish I could remember who's webite I visted to get the general settings. I will link here when I find the site again.
Back to the image - it will depend on the photograph you are using as to what settings you use, the Base Settings worked OK with the image of the beach and industrial works, but I wanted to go a little further. For this photo I simply adjusted the Black Point Slider towards the right.
The image is now ready to export back to Lightroom, so I click on the 'Save and Re-Import button at the bottom of the settings panel (normally on the left hand side).
If you are using Lightroom and Photomatix together, then when you click the 'Save and Re-Import Button, then once the image has finished processing in Photomatix, it will automaticall import itself back into Lightroom, leaving the originals intact.
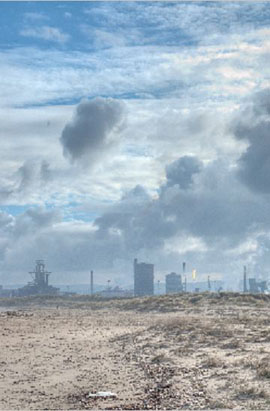
Now that you have your image back in Lightroom, you can enhance your HDR image further by editing it in programs such as Photoshop . Below are two images - the first being the HDR file created using Photomatix, and the second with a little post processing in Photoshop.
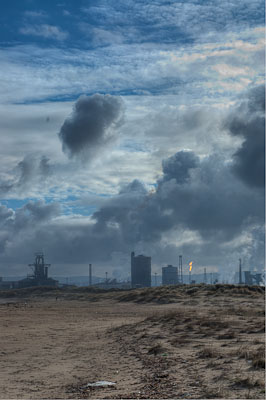
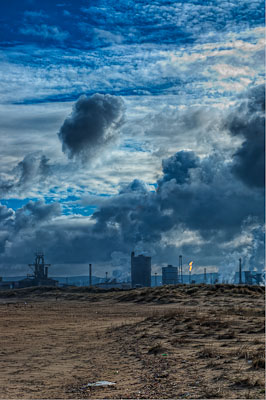
In Photoshop
Once I exported my HDR image into Photoshop, I used to third-party plug-in filters. Topaz Adjust to boost the colours and detail a little, then Color Efex Tonal Contrast to add more umph to the image. Finally, I added a Curves Adjustment Layer set to Medium Contrast.
All that remained now was to remove any unwanted 'Dust Bunnies' (bits of dust on the sensor - HDR will bring them out more pordominantly), and then save the final image back into Lightroom.
