HDR Photography & Workflow
HDR (High Dynamic Range) Photography is becoming increasingly popular these days, and there are plenty of tutorials out there to help you get to grips with it. So why am I posting a tutorial/article here you are asking? Well, rather than a whole nuts 'n bolts tutorial, I thought I would share with you my workflow - from taking the photograph(s) to exporting into Photomatix.
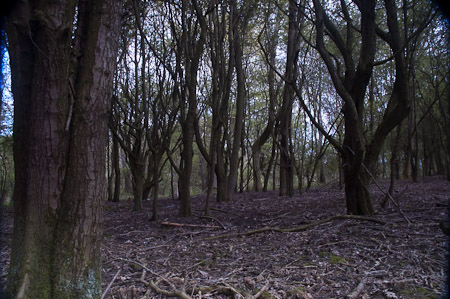
SOOC*/Original
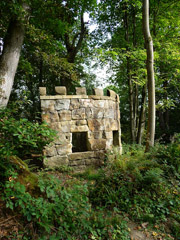
Final HDR Image - 9 exposures plus Dragon Preset in Lightroom [View Larger Image]
Getting My HDR images Process #1
To be honest, I don't always shoot for HDR images - I will take a photograph, get home and look at it and think - no where near what I wanted to achieve, so I will manually create the exposures I need for the HDR.
I was out yesterday with the camera in a local woods. When I got home I thought because of the lighting etc that the pictures needed that little push to bring them out a bit more. Below you can see my workflow from start to finish.
After importing the images into Lightroom, I found the first image I wanted to create a HDR from. I've set up a preset within Lightroom to help me save time with this, thus I am creating .NEF (Nikon format) files rather than TIFFS or JPegs.
Lightroom and Exposures
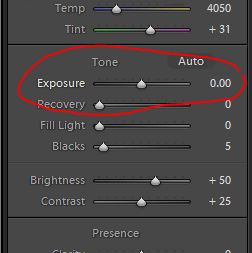
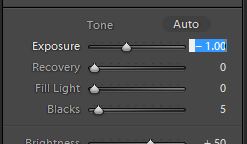
Ok, at least three exposures are needed to create a suitable HDR image - normally 0 +2 -2, but for the final HDR for the above image I used 9 exposures (going extreme I know). After I had straightend the image I started on the exposure images. This is how I created them.
Once I had my image I wanted to HDR I first exported the image as an "Original NEF file" which is Nikons RAW file format. Then I switched to develop mode.
From here I only changed the Exposure. After setting the new exposure I exported the file alongside the original.
As mentioned above, I exported the new exposure with its origianl using a Preset I have made. Below are my settings to keep the original file format, and also to make sure the files go into the same selelction.
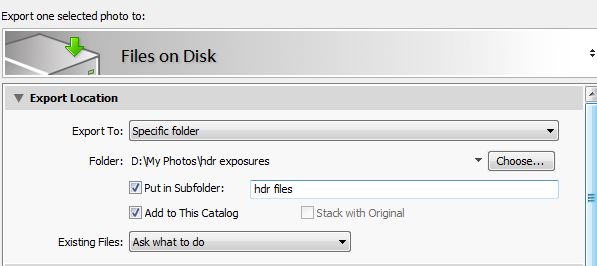
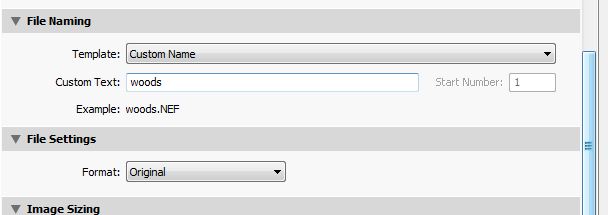
Make sure that the File Settings, Format is set to original.
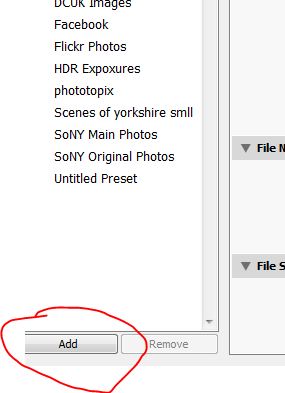 Once you have made these new settings, make sure to click on Save Preset and give it a name, so for future use its a simple "Click & Go" method - you will need to make some basic changes to preset, basically Filename etc, but everything else should still be as is on the Preset Settings above.
I continued changing the Exposure with the following - exporting after every adjustment:
0 -1 -2 -3 -4 +1 +2 +3 +4
Eventually I had 9 exposure images and all had been exported back into Lightroom under the subfolder of HDR files.
The next step is to get them into the HDR software.
For this image I used Photomatix, and thankfully I can export all my images direct to Photomatix via Lightroom itself.
To do this, find your HDR Files in Lightroom and select all the images you have created for your HDR image. Once you have done this "Right Click" on one of the images and select Export.... Photomatix Pro.
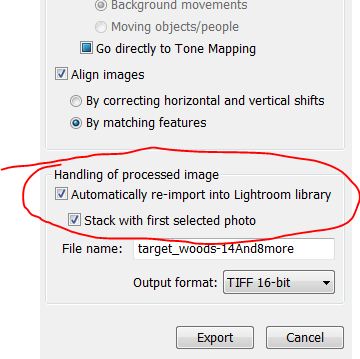 Lightroom will now send your individual images to Photomatix. you will be asked to alter any of the options from the dialogue box, but you can leave these alone if you like - just make sure that "Handling of Processed Image" is similar to the image opposite.
This way, once you have created your HDR image, clicked on Save and ReImport, your final HDR will be "stacked" with your oringinal files making it easier for you to locate once you go back into Lightroom.
Creating the HDR Image in Photomatix
The first thing that appears in Photomatix is your exposure settings. Just make sure that these settings tally up with the original settings you created in Lightroom.
 Once happy click on the "buttob" depending on the speed of your computer this might take a little time.
Play around with the various settings to achieve the HDR effect you want - or you can download my Presets here and have a look through each setting and decide which setting suits your image best.
Once you have you are happy with the overall HDR effect, click on the "Save and Re-Import" button. This will send your new HDR file back to Lightroom.
Going That Step Further
Now you have your HDR file "stacked" next to your originals, it is up to you if you want to delete the exposure images or keep them for a later date. The important thing is that your new HDR file is present in the Library.
For my final image, I applied a free download preset to get a "Dragan" effect, and my final image was complete.