Understanding Layers
How do Layers work? Well, one way to think about it is this. You are making a sandwich for a quick snack, you place your butter on the bottom slice (Background). You then add a piece of ham (Layer 1), some cheese (Layer 2), and some tomatoes (Layer 3). Finally you put a piece of buttered bread on top (Layer 4).
Apart from making you feel hungry, just think of layers in this way.
Why use layers in the first place? Basically, by using layers you are leaving your original image intact, so if you make a mistake, it can be easily rectified without having to start from scratch.
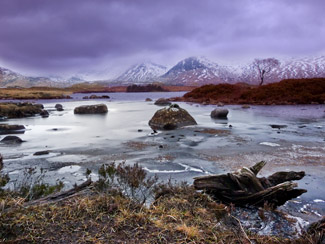
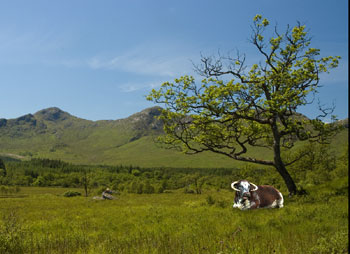
Layers are great for making composite images where you use different elements from other photographs to make a whole new image, like the one pictured here.
For this image of Rannoch Moor, in the highlands of Scotland, I used three separate photographs to make up this final image.
There is a layer for the foreground, one for the iced loch and another for the clouds and mountains in the distance.
It's a good idea to get used to using layers where ever possible. For instance, when cloning out unwanted items from an image, you would ideally clone onto a new layer, so that if something does go wrong with your editing, then you are still going to have your original image.
Another advantage of using layers is that you can duplicte layers and change the Blend Modes, allowing you to create more effects at a couple of clicks of the mouse button.
Working Example
Through the next stages, we will take George, here, and give him a more flattering background and environment. Techniques used here will introduce you to Layers, Adjustment Layers and Layer Masks. It might sound a bit overwhelming, but just click on his picture, download the file and follow along at your own pace.
Open the image of Donkey into Photoshop, and click twice with the left mouse on the Background Layer. If your Layers Palette is now visible, press F7 on the keyboard to access it.
Now that the Background Layer is unlocked, it is effectively known as a 'floating layer', which basically means the layer can now be moved around by using the Move Tool (accessed by pressing the 'V' key).
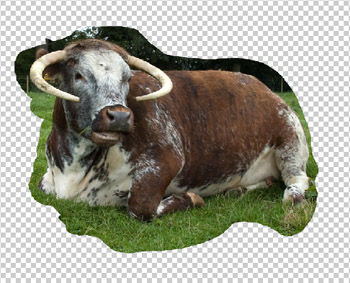
Grab the Lasso Tool from the Tool Box by pressing the 'L' key, and then draw a rough selection around George. From here there are at least two ways to remove the background. The first by using the Eraser Tool, and the second by applying a Layer Mask. We are going to do the latter - don't worry if you can not get Layer Masks, just use the Eraser Tool if you like.
With your selection made, first make sure Black is the foreground colour, and White is the background colour by pressing the 'D' key. Now go over to the Layers Pallet and left-click on the third icon from the left - this will add a Layer Mask to your image - notice, as soon as you click the Layer Mask icon, the background is removed around your selection! You should see a chequered background as in the image above.
The beauty of using the Layer Mask, is that your background is still available to you - it can be painted back in again using the brush tools. Its really handy if you have made a mistake, press 'X' then select the Paintbrush Tool (the 'B' key will activate it), and you can paint back in the missing areas.
Ok, now to remove the remaining background around George - make sure you are painting onto the Layer Mask, and NOT the actual image. You should see a black border around the Layer Mask icon in the Layers Palette.
Adding New Background
Open the new background image, then press 'CTRL+A' to select the whole image then 'CTRL+C' to copy the image to the clipboard (computers temporary memory). Close the image without saving (if asked) and return to where we left George.
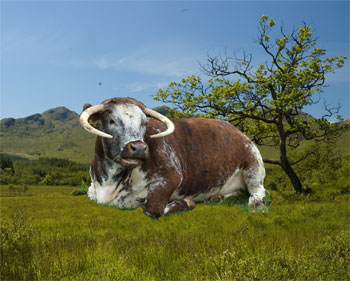 Pressing 'CTRL+V' will paste the new background layer on top of the layer with George on. Click and hold the left mouse button on the new layer, and drag it below George. At the moment, George is looking a little out of scale for this image, so we need to give him a little working on by using the Free Transform Tool.
Click on the George layer to activate it and press 'CTRL+T' to activate the Free Transform tool. Hold down the Shift Key and left click the mouse button on any of the corner nodes (the little squares around the selection). By moving the mouse in towards the center of the selection the image of the cow will shrink, keeping the aspect ratio correct (because you are holding the Shift Key). Moving the mouse out from the selection will make him bigger.
Shrink the selection so it looks as if George will lie snuggly in his new environment. When you are satisfied, hit the 'Enter' key to accept the new changes.
Finishing Touches
All that remains now is to make George blend in with his new surroundings. By using the Clone Tool (Clone Tutorial) clone in some grass around the base of his body, then using the Dodge & Burn Tools add some shadow over his back.
 It is important to remember that when you add new objects to a scene, that you make sure you add the shadows in the right place - people will always notice if a shadow is missing, but will not always see the shadows!
Also it is a good idea to try and get images that have the same kind of lighting or tones, otherwise you could find yourself with more work trying to get the images to blend nicely together.